Are you looking for an answer to the topic “How To Backup iPhone To iTunes (ComputerMac) & Restore iTunes Backup To iPhone !!“? We answer all your questions at the website Chambazone.com in category: 40+ Marketing Blog Topics & Ideas. You will find the answer right below.
Connect iPhone and your computer with a cable. In the iTunes app on your PC, click the iPhone button near the top left of the iTunes window. Click Summary. Click Back Up Now (below Backups).Your device backs up to your Mac during the next automatic backup. Select the “Encrypt local backup” checkbox to encrypt your backup data and protect it with a password. To change your password later, click Change Password. To immediately start a backup of your device to your Mac, click Back Up Now.If you back up your iPhone, iPad, or iPod touch, you’ll have a copy of your information to use in case your device is ever replaced, lost, or damaged. On your Windows PC, open iTunes. If you don’t have it on your PC, download iTunes.
- Open iTunes on your Mac or PC.
- Plug your iPhone into your computer.
- Click the phone icon in the top left corner.
- Click Back Up Now.
- When complete, select the eject button in the top left corner before unplugging your iPhone.
Table of Contents
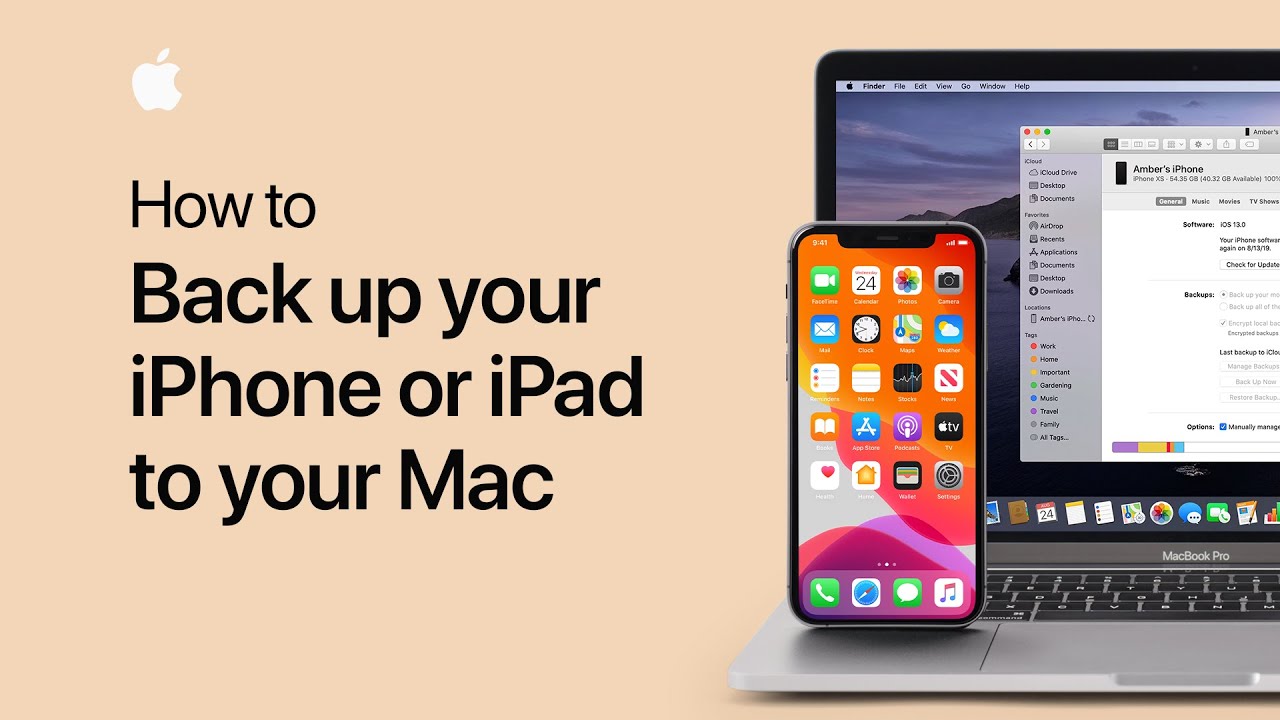
How to back up your iPhone, iPad, or iPod touch to your Mac — Apple Support
Images related to the topicHow to back up your iPhone, iPad, or iPod touch to your Mac — Apple Support
In the previous article, we saw a detailed article to backup your iPhone to iCloud storage and restore iPhone backup to your new device. It’s time to learn about the next alternative to backing up your iPhone using the iTunes app. So, just sit back and enjoy reading this article to know more about the steps to backup iPhone to computer/Mac device quickly. In fact, before proceeding, it is very important to understand the difference between the two methods of creating an iPhone backup. Let’s take a quick look at all the topics we’ll cover in this post now: What exactly is the difference between iCloud and iTunes backup modes (iCloud backup vs. iPhone’s iTunes backup)? How to Backup iPhone to iTunes (Any Computer/Mac Device)? How to restore iPhone backup from iTunes (computer)? Without wasting any more time, let’s start by examining each of the topics listed above indivually. If you want, you can skip any part and jump straight to the actual step of capturing the backup (though it’s still a wise decision to have the background information).
What Is The Difference Between iCloud Backup And iTunes Backup ? (iTunes Vs iCloud Backup For iPhone!!)
We’ll see the exact pros and cons of each approach here. So let’s know the same thing starting with iTunes backup options. The iTunes backup option requires you to connect a cable between your Mac or desktop PC and your iPhone. Whenever you back up with iTunes, it’s called a local backup. This means that all you need to do is back up your iPhone data to your laptop’s local storage (or any external hard drive) via a wired connection. Possible downses of iTunes backups: If something goes wrong with your computer (stolen/lost/technical), you may lose all saved iPhone backups from your PC. With iCloud, we don’t need wires or cables to back up your iPhone data. With just a few clicks, you can backup iPhone data to cloud storage. No wired connection required. This is an automatic backup option that does not require any manual intervention (unlike iTunes backup solutions). You can always buy a premium plan with 50/200GB storage options (so you have to spend some money). The backup process in iCloud is slower than the iTunes backup process (because the backup happens locally on your PC, unlike the iCloud option where you upload data to a cloud server). Recommendation: Our personal recommendation is to use the iCloud backup option. If you absolutely don’t want to pay, just choose the iTunes backup (manual) option. Additionally, you can choose between ease of use and complacency options.
How To Backup iPhone To iTunes ? (All The Steps You Need To Backup iPhone To Computer/Mac Device !!)
iTunes backup is basically a way to transfer iPhone backup to desktop computer/Mac device. For this backup method, you need to connect your iPhone to your Mac/computer. Therefore, an iTunes backup of this iPhone can come in handy in any of the following situations: 1. You bought a new iPhone and want to transfer data from local storage. 2. You want to do a factory reset (backup then restore). ) 3. You just want to clear cache files to free up space on your iPhone. Whatever the reason, you must follow these steps: 1. Launch the iTunes software application on your desktop PC (any Windows/Linux/Mac device) Note: After connecting your iPhone to your computer, you must follow the screen Some of the instructions on your phone, such as B. Trust this computer or enter a passcode on your iPhone, etc. Then you can see your iPhone appear on your computer screen. Close the window and continue. 2. Connect your iPhone to the Mac (computer) via the Lightning connector. 3. Click on the small iPhone icon in iTunes (the iPhone icon will appear in the upper left corner). and you can see the Backup section in the iPhone Details screen on this computer instead of iCloud) 6. Now click the Backup Now option on the right to start backing up your iPhone manually. (You can also view the latest available backup in this section) 7. Once the backup process starts, you can see the progress above. Since we dn’t select the “Encrypt iPhone Backup” radio button (explained later), now let’s create an unencrypted backup of your iPhone. 8. This unencrypted backup process will backup everything from your iPhone to your computer, but will not back up “Health and Activity Data” as well as keychain data, other app data, etc. If you don’t want to backup “Health and Activity Data” to your computer, then you must encrypt your backup. 10. After the backup process is complete, you can see the date and time of the last backup in the “Last Backup” section. Note: To check the backup, go to Edit (above) -> Settings -> Click on Device at the top of the popup screen -> Here you can see the last backup with the date and time associated with your device (you can also download it from Delete the old backup here) Now we should start worrying about where this backup data is located on our computer/mac device (once the backup is done). Below we indicate the path that must be followed to find the backup data. We’ll start with a Windows PC first and then move on to the Mac device path. 1. Open any folder on your computer. 2. Use the folder tree on the left to go to the “C” drive. 3. Go to the right and select Users. 4. Select your computer’s username from the list 5. Click on “Appdata” and then select “Roaming”. 6. Click Apple Computer, and then select MobileSync. Your external hard drive for later use. The above path is for Windows PC, if you are a Mac user then you may find the following path useful on your Macbook device: ~/Library/Application/Support/MobileSync/Backup Just click on the menu bar and enter the above Path finds all backups stored on your Mac device. Above we saw the steps for an unencrypted iPhone backup (without your health and activity data). Now we will see the steps to create an encrypted data backup for your iPhone. Note: In encrypted data, you also back up keychain data, health and activity data, application data, login information, etc. So once you restore this encrypted data backup to your iPhone, you don’t need to log in any more to use these apps because they are already logged in with the stored (backed up) credentials. 1. In the “Summary” section on the left, you can see the “Backup” section. 2. Now we want to backup the iPhone to the computer’s local storage, we need to change the backup option to “This Computer” (all future backups will be stored on this computer, not iCloud) 3. Now check the “Encryption” option iPhone’ box, then it will prompt you to create a new iPhone passcode (remember this). If you forget to do this, you will no longer be able to restore this backup. 4. After clicking the “Set Password” option, your iTunes will start backing up iPhone data. You can see the progress bar. 5. Also in the future, if you want to create an iTunes backup on your computer, you just need to select the “Backup Now” option and the backup will be encrypted automatically (remember this password). If you want to restore this backup, you will also need to enter the encryption password again. Note: To check the backup, go to Edit (above) -> Settings -> Click on Device at the top of the popup screen -> Here you can see the last backup with the date and time associated with your device (you can also access it from here delete old backups), you’ll see a small lock icon next to the backup (indicating that it’s encrypted).
How To Restore iPhone Backup From iTunes ? (All the steps to do so !!)
Now it’s time to use the iTunes backup we saved in the previous section. Before we proceed with these steps, make sure you are connected to an active data connection and that your iPhone is connected to your Mac/computing device via the Lightning connector. Note: First you need to connect the new/old device to your computer, then follow the steps below. After connecting your iPhone to your computer using the connector, you will need to follow certain on-screen instructions, such as: B. Trust this computer or enter a passcode on your iPhone, etc. You must enter correct credentials. Then you can see your iPhone appear on your computer screen. Close the window and continue. To restore an iTunes backup to your iPhone, follow these steps: 1. Click on the small iPhone icon shown above. Note: If it’s a new device, you may need to perform some extra steps on your computer, then select the “Restore from Backup” option on the last screen to begin the old iPhone recovery process. Follow these steps: 2. First, we need to turn off the Find My iPhone setting in the iCloud section of the iPhone, to access sa settings, just follow the path given in the iPhone: Click on your name (in Settings medium) -> click on “iCloud” -> scroll down and find “Find My iPhone” -> if activated, set (toggle) this setting to “off” -> you will now need to enter your Apple ID password -> Finally click “Close”. Turn off the switch as shown in the image below: Enter your Apple ID password and tap “Off”: NOTE: If it is already off, follow the steps below (just make sure it is off) 3. Now go to the iTunes app on your computer program. 4. In the Backup (Summary) section, click the Restore Backup option on the right. 5. You will now see a pop-up window where you can select a backup file from the available backups (Pro tip: select the newest/latest one from multiple backup files) 6. Click on the Restore option (encrypted The backup option requires you to confirm your restore request with a passcode) 7. After that, your iTunes will start restoring your iPhone from the available iTunes backup. 8. At the same time, you will see a “Recovery in progress” message on your iPhone. 9. Wait for a while for your iPhone to connect to your Mac/Computer device, you get an error in iTunes, such as B. “iTunes could not connect to this iPhone because of a passcode”, you can ignore this error message now and wait for a while Wait a moment. 11. Now you need to follow the instructions on your iPhone, such as B. Select the Wi-Fi network, enter your Apple ID password, etc. (your iCloud settings will be updated automatically). that’s it. Then you can see that some apps are still being downloaded from the Apple App Store. The backed up app data already exists, but it takes time to download the app. Note: You won’t see any errors in iTunes after downloading the full data to your iPhone. Everything will go back to normal and your iPhone will be recognized as usual again. Depending on the software running on your Mac or PC, the next step involves the Finder on Mac or iTunes on Windows (or on Macs with older versions of macOS). macOS Catalina 1. If you are running Catalina, open a Finder window 2. You will see your iPhone or iPad under Locations on the left se of the Finder window 3. Click on macOS Mojave or earlier if you are on your computer To run Mojave or earlier Mac you need to open iTunes. You can run multiple versions of iTunes, each in a different way: iTunes 12 Click the iPhone icon in the upper left corner of the iTunes window. iTunes 11 Click the iPhone tab on the right se of the window. iTunes 10 iPhone is in the left sebar. Once you find your iPhone, you can follow the iTunes backup and restore steps above.
iPhone Data Backup And Restoration Using iTunes (backup iPhone from Mac / computer PC ) Final Thoughts !!
As you can see above, iPhone backup and restore using iTunes is really easy if you really like the secure wired method of iPhone backup. Plus, it won’t cost you a cent. But if you’re a more tech-savvy person who wants everything in the cloud (:-p), then you should definitely go for the iCloud backup option. If needed, you can view the list of additional options at the bottom of the iPhone details screen, which is H. “Options” section, go ahead. You can select the first option (Sync automatically when this iPhone is connected) to automatically start syncing iPhone data when you connect to the iTunes application on your PC. Hope you really enjoyed this informative post on the steps to transfer iPhone backup to iTunes and how to restore iTunes backup to iPhone. If you want to know more about backing up iCloud from iPhone, please read this article. Stay tuned for more interesting content in this series. report this ad
How do I backup my iPhone to iTunes on a Mac?
- Open iTunes on your Mac or PC.
- Plug your iPhone into your computer.
- Click the phone icon in the top left corner.
- Click Back Up Now.
- When complete, select the eject button in the top left corner before unplugging your iPhone.
Can I still backup my iPhone to my Mac?
Your device backs up to your Mac during the next automatic backup. Select the “Encrypt local backup” checkbox to encrypt your backup data and protect it with a password. To change your password later, click Change Password. To immediately start a backup of your device to your Mac, click Back Up Now.
Can you backup iPhone To iTunes?
If you back up your iPhone, iPad, or iPod touch, you’ll have a copy of your information to use in case your device is ever replaced, lost, or damaged. On your Windows PC, open iTunes. If you don’t have it on your PC, download iTunes.
How do I transfer everything from my iPhone to my Mac?
Transfer files between iPhone and your Mac
Connect iPhone to your Mac. You can connect using USB, or if you set up Wi-Fi syncing, you can use a Wi-Fi connection. In the Finder sidebar on your Mac, select your iPhone. Note: To use the Finder to transfer files, macOS 10.15 or later is required.
How do I backup my iPhone to my Mac without iCloud?
iTunes Backup
To back up with iTunes, plug your iPhone into your PC or Mac, open iTunes, and sync your files between your PC or Mac and iPhone. Unlike iCloud, iTunes backs up all your photos, images, media files not purchased from iTunes, messages, call logs, application data, settings, memos, calendar, and bookmarks.
How do I backup my entire iPhone?
- Connect your device to a Wi-Fi network.
- Go to Settings > [your name], and tap iCloud.
- Tap iCloud Backup.
- Tap Back Up Now. Stay connected to your Wi-Fi network until the process ends. Under Back Up Now, you’ll see the date and time of your last backup.
Can I backup my iPhone to my computer instead of iCloud?
Backing Up to a computer
Backing up an iOS device to a computer – either via the Finder or via iTunes – is easy, and much quicker than backing up to iCloud, because the data just goes over the cable that connects your iOS device to your Mac. However, these backups only occur when you sync your device.
Where does iTunes backup iPhone?
Once in the Appdata folder double-click the “Apple” folder and then “Apple Computer” and “MobileSync” and finally go to the “Backup” folder and you’ll find all your iTunes backups.
Why can’t I backup my iPhone on my Mac?
Make sure your Mac or PC is up-to-date. If you’re using iTunes, make sure that you have the latest version of iTunes. Connect your device to your computer with a USB cable, and locate your device on your computer. If your device doesn’t appear in Finder or iTunes, learn what to do.
How long does it take to backup iPhone to Mac?
Should take approximately 15-20 mins depending on your wifi or internet connection speed. Depends whether you backup to iCloud or to iTunes. Backing up that amount of data to iTunes usually takes about a couple of minutes or so.. depending on the speed of your computer.
Why is my iPhone not showing up on iTunes?
Make sure that your iOS or iPadOS device is turned on, unlocked, and on the Home screen. Check that you have the latest software on your Mac or Windows PC. If you’re using iTunes, make sure you have the latest version. If you see a Trust this Computer alert, unlock your device and tap Trust.
See some more details on the topic How To Backup iPhone To iTunes (ComputerMac) & Restore iTunes Backup To iPhone !! here:
How to back up your iPhone, iPad, and iPod touch with your Mac
Back up with the Finder. On a Mac with macOS Catalina or later, open a Finder window. Connect your device to your computer with a USB cable.
How to back up your iPhone, iPad, and iPod touch – Apple …
Choose a backup method. Before you get started, learn the difference between iCloud backups and backups you make using your computer. Then …
Back up and restore your iPhone or iPad to your Mac or to …
Back up your device · Select “Back up your most important data on your [device] to iCloud” to store backup data in iCloud instead of on your Mac. · Select “Back …
Back up your iPhone, iPad, or iPod touch in iTunes on PC
To see the backups stored on your computer, choose Edit > Preferences, then click Devices. Encrypted backups have a lock icon in the list of backups. Restore …
Related searches to How To Backup iPhone To iTunes (ComputerMac) & Restore iTunes Backup To iPhone !!
- Recover from iCloud Backup file
- itunes is waiting for windows update to install the driver for this iphone
- huong dan backup iphone bang itunes
- iTunes is waiting for Windows update to install the driver for this iPhone
- how to backup iphone to itunes mac mini
- itunes backup location
- iTunes backup location
- itunes could not restore the iphone because an error occurred
- Hướng dẫn Backup iPhone bằng iTunes
- recover from icloud backup file
- itunes could not connect to this iphone
- macbook not recognizing iphone
- how to backup iphone to itunes mac os
- itunes could not restore the iphone because the backup was corrupt
- iTunes could not connect to this iPhone
- Macbook not recognizing iPhone
- how to backup iphone to itunes mac m1
Information related to the topic How To Backup iPhone To iTunes (ComputerMac) & Restore iTunes Backup To iPhone !!
Here are the search results of the thread How To Backup iPhone To iTunes (ComputerMac) & Restore iTunes Backup To iPhone !! from Bing. You can read more if you want.
You have just come across an article on the topic How To Backup iPhone To iTunes (ComputerMac) & Restore iTunes Backup To iPhone !!. If you found this article useful, please share it. Thank you very much.